Creating a PGP key pair #
When you create a PGP key pair, it gives you two unique keys: a public key, and a private key. You are to not, at any times, or for any reason, to give anyone your private key. That is for your eyes only. Your public key, however, is able to be given out so others can encrypt messages with your public key, send them to you, and then only YOU can decrypt them with your private key.
When you sign up to a market you may be asked to enter a public key. To prevent your market accounts from being linked together, you should always generate a new key pair for every account you make. Never upload the same public key to multiple accounts.
By uploading your public key you allow your vendor to securely send you sensitive information about your shipment (e.g. tracking codes). It can also serve as a two factor authentication mechanism to login to a market: every time you login you are required to decrypt a message containing a special code. Entering this special code proves that you own the account, because only you would be able to decrypt the message.
You should not keep private keys around that are no longer in use. If you make a new account on a market, delete the old key. If a markets gets busted or exit scams delete all keys for the accounts you created on that market. In the event that your private keys are compromised you want an attacker to be able to decrypt as little sensitive information as possible.
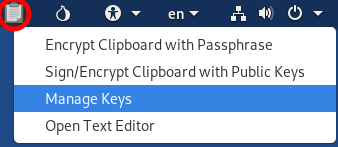
Click on the clipboard icon on task bar at the top of your screen and select the option “Manage Keys”.
On the new window that appeared, click on “File” at the top and select the “New…” option. Then a list of items shows up that you can create, choose “PGP Key” and click “Continue”.
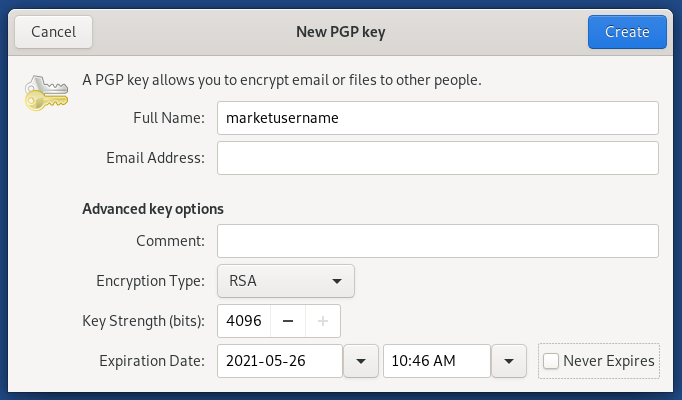
Then you can enter your “Full Name”. Obviously do not use your real name because everybody that has your public key later can see that name. Never use a name that can be linked to your real identity.
If you’re making a new key to sign up to a market it is best to fill in your market username, this will make it easier for your vendor to encrypt messages for you.
It is recommended to leave the email field blank. If you want to be contacted via email you can add one, but please make sure that it fulfills the recommendations mentioned in the email chapter.
Under “Advanced key options”, set the “Key Strength (bits)” to 4096 and the “Expiration Date” to one or two years in the future.
Note: Setting an expiration date does not prevent messages that were encrypted with the associated public key from being decrypted in the future. In other words, if your private key is ever compromised an attacker can still decrypt messages after the key is expired.
The expiration date only serves as a reminder to periodically rotate your key pair, to limit the amount of sensitive information that can be decrypted with a single private key. When you do this be sure to let others know you are changing your key by signing your new public key with your old key.
Rotating a key only applies to keys that were created for off-market use. For example, a public key that you add to your profile on Dread. Keys created for market accounts are generally short-lived and should not be kept around for long.
Confirm the data by clicking on “Create”. You will now get asked to set a password which is, in combination with your private key, necessary to decrypt messages that were encrypted with your public key. Please choose a strong password by using KeePassXC.
After you clicked on “OK” you will have to wait a bit (usually not longer than a few minutes) and you will see your key in the list of GnuPG keys (click on “GnuPG keys” on the left sidebar).
Congratulations, you have now created your own PGP key pair!
One last thing: if you want to copy your public key, just select your key in the “GnuPG keys” list and press CTRL + C. Now you have your public key copied and can paste it anywhere.
Your public key should look like this:
-----BEGIN PGP PUBLIC KEY BLOCK-----

mQINBFhNDOsBEACzwJJVsMo7sIiLhvCsLx2n+DVHzw1trM/C8Yao8EmWdDYe3ei9
mXRqSudbD6S4KvJfm+ZeOlEQ6gGoG2q3aFYASRgcK7WDhs+jwG42Ey+j2oIpU/EO
8EQXTmTn8T+LQT84JZ5KkiZZp2CqLU8RVszfkKEj1oX/sO5watxNQur4fbk9FiCA
1MjHMYir1g==
=TV04
-----END PGP PUBLIC KEY BLOCK-----
The gibberish part in the middle will be a bit longer though.
Do all of the following steps on the Whonix Workstation. Open KGpg by double clicking on the shortcut on the Desktop. On the top bar go Keys -> Generate Key Pair.
Then you can enter your Name. Obviously do not use your real one because everybody that has you public key later can see that name. It is best to choose the same username that you already have on a market because it will make it easier for your vendor.
The name has to be at least 5 characters long, if your name is shorter just add the market that you are using at the end of it or “DNM” for example.
After that you can enter your email address. It is not necessary and if you do not have one you can leave it blank. However if you want to create one please take a look at the Email chapter of the DNM bible. If you already have one that you want to enter in that field, please make sure that it fulfills the requirements mentioned in the Email chapter.
If one of the points is not fulfilled, please create a new one by following the steps in the email section or do not enter an email address for the PGP key creation.
Leave the Comment field empty. Set the key size to 4096 (bit) and the Expiration to one or two years in the future. Keep in mind anyone with access to the primary private key can extend the expiration date (even after it has expired) or spoof time. Messages that were encrypted with the associated public key can always be decrypted.
Note: Setting an expiration date does not prevent messages that were encrypted with the associated public key from being decrypted in the future.
It only serves as a reminder to periodically rotate your key pair, to limit the amount of sensitive information that can be decrypted with a single private key.
Confirm the data by clicking on “Create”. You now get asked to set a password which is, in combination with your private key, necessary to decrypt messages that were encrypted with your public key. Please choose a strong password by using KeePassX.
After you clicked on “OK” you will have to wait a bit (usually not longer than a few minutes) and you will see your key in the list of GnuPG keys (click on “GnuPG keys” on the left sidebar).
Congratulations, you now created your own PGP key pair!
One last thing: if you want to copy your public key, just right click on your key in the “Key Management” window (the one you see after opening KGpg through the shortcut from the Desktop), select “Export Public Key” and check the options “Clipboard” and “Clean Key” on the newly appeared window. Now you have your public key copied and can paste it anywhere, like in your market profile which you should definitely do.
Your public key should look like this:
-----BEGIN PGP PUBLIC KEY BLOCK-----
Version: GnuPG v1

mQINBFhNDOsBEACzwJJVsMo7sIiLhvCsLx2n+DVHzw1trM/C8Yao8EmWdDYe3ei9
mXRqSudbD6S4KvJfm+ZeOlEQ6gGoG2q3aFYASRgcK7WDhs+jwG42EA+j2oIpU/EO
8EQXTmTn8T+LQT84JZ5KkiZZp2CqLU8RVszfkKEj1oX/sO5watxNQur4fbk9FiCA
1MjHMYir1g==
=TV04
-----END PGP PUBLIC KEY BLOCK-----
The gibberish part in the middle will be a bit longer though.